Showing posts with label track plans. Show all posts

Thursday, April 11, 2024

Laying Copper Tape over Track Rails and Testing

Laying copper tape over rails is a PITA, but definitely worth it when it comes to power consistency. I've got one lane done and took a minute to test with a Carrera BMW M6 GT3. The track is just basically functional - I haven't set up the driver stations yet (those will be located at each end of the "U") so I'm getting whiplash standing in the middle, trying to follow the car with the stock controller and a 2-foot connection wire. The video is shot from a wide-angle webcam I just installed to see if I can get a complete track view.


For now, I'm collecting some of the components I'll need to finish things up, some driver station hardware from Slot Car Corner, two adjustable power supplies, additional wiring and other odds and ends. Obviously there's still a lot of scenery work to do, but at least I'll be able to do some testing and tuning as that work proceeds. As noted previously, this is a1:32 Artin track is 50.25 ft (each lane) or 15.31 meters.


Monday, January 29, 2024

SJ EPISODE 7: Building a New Track Part 1 - Planning

The new track build series kicks off with what I hope will be a fun and interesting group of videos that will help take viewers on my personal track-building journey. As mentioned previously, I want to start at Ground Zero and proceed through the entire process, and in this first installment, I review some of the most essential considerations that slot track builders will want to think about before they start laying parts and pieces out on the table.


In the video, I cover issues like what kind or racing that will take place, the space available, building a table for the track, power and control, and basic approaches to scenery.  I also note some other topics that might be considered do's-and-dont's, but really are items that you should think about before going to far. Everyone's tastes and preferences are different, so feel free to make your own rules as you go! The video can be found here: https://www.youtube.com/channel/UCH5Owd2g7pFJ1USpI_ntriw?sub_confirmation=1


Wednesday, January 17, 2024

Welcome Back...with The New Track

 Yes, it's been way too long since I posted here or put out a video...but a lot has happened over the intervening months.I spend much of the Summer vacationing and traveling, then received a nice retirement offer from my employer that was simply too good to turn down. Of course, a lot of planning and paperwork goes along with the territory, and that took a lot of time and effort as well.

Add to that the fact that I became a first-time grandpa in late September and you can understand that I've been a little busy. That has been a lot of fun for me, but now that the holidays have come and gone, I'm ready to devote some serious time to the hobby.


Over the last month or so, I've started on construction for the new track - it's very similar to the last one I had. The New Schweizering features more R3 and R4 turns, has a better flow and some additional adjustments to not only improve flow but also to provide better support, electrical systems for lights and wiring, and scenery improvements. I'm re-using some components from the old track (like the castle) and rebuilding most everything else from scratch.


I've got  a few pics here, but since construction has begun, I've been documenting most of it through some videos and photos, so you'll be seeing some of that here and on my Facebook site. YouTube videos are coming as well, so be on the lookout!


Sunday, April 16, 2023

This Has Got to be a World-Record-Size Home Track

 I'm sure a lot of people share one of my wife's hobbies - scanning Zillow to look at people's houses and seeing what today's dollar will buy in various parts of the country. We're not planning to move anytime soon ourselves, but it's always fun to think about what it might be like to live somewhere else or have a vacation home. So, the other day, when she mentioned that she had come across a house not far from us that had 8 slot car tracks I knew I had to check out that listing. What she really meant was that it was not 8 separate tracks, but a SINGLE 8-LANE HOME TRACK.


Not that there's much of a difference. The track - which appears to be located in the basement - has to be the biggest track that I have ever seen in a house. Not that it's really a home track...it appears to be a huge commercial track that someone managed to cram inside their house. Cram might not be accurate, though, since it appears that there is room to spare around this behemoth.

Someone on my Facebook page said they think this track may have once been located at a commercial shop in Elyria, Ohio - which may be possible, that's only about 45 miles away. In any case, this is certainly impressive. Did I mention the house also has an indoor pool? For over a million dollars, it should. Definitely out of my price range...

The listing can be found HERE.


Wednesday, March 8, 2023

Settling on a (newish) Track Layout

So after collecting the various sections of Artin track that I needed and making some final alterations, I think I’ve settled on a layout for my next track. Not surprisingly, it’s not so different from my previous track, which was removed about 3-4 years ago. The layout – a U-Shaped affair with a raised “Alpine” run on the left, a grandstand/pit area and long straight at the rear center, and an “Old City” section on the right, is essentially the same. Lane lengths are the same - just a hair over 50 feet, or 15.25 meters; as always, I resist the inclination to stuff as much track as possible into the space.


I’ve adjusted things a bit to give some more room for scenery in a few spots—so things are less cramped. Most importantly, where all the curves in the old track were R1s and R2s, the R2s have now been left out (I no longer have them) and R3s and R4s have been substituted. As a result, some of the curves have been loosened up a little to make things flow a little better. I lost about a half-section on the long grandstand straight, but this let me fit a 90-degree R3 turn at the end, which should be an improvement over the R2 turn I had before. There is also one less “squiggle” on the downhill ride from the highest section – which still remains the most technical section of the circuit.

The "Alpine" portion of the track will be similar to the prior design, with some changes.

Overall, the levels of each section will be much as they were before, although the alpine section may not be quite as high it was previously (it was almost 16 inches above the base level of the track). How high depends on how things “feel” during construction and how much room is available around the edges of the space. I’ve moved some scenic elements around for better placement and track visibility; the planned sky lift/cable car feature will be there (non-operating, sorry) and the configuration of the Old City will remain pretty much as before. I’d also like to add a small water feature, purely for visual interest. As before, the pit lane is non operational--the track will be analog, as are all my cars.

The "Old City" portion of the track will be configured much the same as this one.

In the end, the simple fact is that I loved the track the way it was previously, and the tweaks involved in the new design are there to make it slightly smoother and to improve sight lines. Actually, the biggest difference in the tracks will be the underpinnings; the old track was supported by a collection of small tables (of differing heights) a small 3-drawer dresser and some hollow-core doors. Track supports were cobbled together out of cardboard boxes, 2x4 cut-offs and other bits of wood and styrofoam. Once plastered in, it looked good and all held together quite well – but there was little if any pre-planning for electrical, lighting or time keeping, which were rudimentary, at best. Everything underneath was hidden by large panels of foam core, which looked OK and were removable, but certainly not sturdy.

This might give you an idea of how my first track was supported. Pretty sketchy.

This time around, the track will be supported by proper cabinetry, with plenty of room for storage, doors to hide everything. Power, wiring, timing and audio will be fully integrated into the track and designed for easier hookup and maintenance. Pretty sure I will be using SmartRace here as well. As the prior effort was just cobbled together as I went along, this one will be planned more carefully from the start. This will take some time and effort, but I do not lack for tools.

One of the biggest jobs is to clean the space out and prepare it for construction—currently it is home to leftover project lumber, some furniture, golf clubs, a small refrigerator, a window AC unit, table saw and an old Barbie dollhouse, among other things. But where will I put all of that? As Some in the garage, some in the attic, and some in the trash bin, I guess.


Tuesday, February 21, 2023

Car & Driver Magazine Features Custom Slot Car Track Featuring 'Animal House' and More

 We've all seen the work of Slot Mods Racing - they've produced plenty of awesome real-world-inspired slot car tracks. Featured on Car & Driver, the company's newest creation brings together The Blues Brothers, Animal House, Mad Magazine, and other pop culture icons to the small stage. This track isn't modeled on anything that exists in the real world - instead it takes inspiration from decades-old pop culture.


The new track, called Mad Cave Raceway, combines nostalgic movie scenes - including the infamous float parade from Animal House along with references to The Blues Brothers and billboards for Mad Magazine and Spy vs. Spy cartoons. As you can see from the photo above, the track even includes a custom car made in the shape of the cake float from the Animal House movie.  To read the original article, go HERE.

Sunday, January 29, 2023

So You Want to Add a Tunnel to Your Slot Car Track?

For slot racers who like to focus on the scenic aspects of their track, tunnels have always been one of those things that can really add a lot of visual impact. Some of the best artists I have seen on the various forums manage to make the creation of tunnels look easy; in truth, what we are seeing is always the result of careful planning and thoughtful construction.

Everybody likes tunnels, right?

Often the temptation is to build a structure of some sort and mound a plaster effect over the surface, creating something that is supposed to represent a mountain. Depending on the size, design, proportions and materials, the end result may look good -- or it may not. Before starting, there are lots of things to consider:

1) Is the track going to pass through the tunnel? If so, will it be a straight section, or a curved section? A straight section is always preferred, because cars often de-slot on curves, and the combination of a curve and a blind spot in the tunnel will probably increase your marshaling duties.

2) Would a mountain or tunnel look right on your track? If you're doing a hilly or mountainous Alpine region, sure. Make sure your hill or tunnel feature fits in with the overall landscape of your track. Also - LOOK AT NATURE - you should try to ensure your land forms try to resemble something you'd actually see in the natural world.Think - if an engineer was building a track or road in that spot - would they actually create a 50-foot tunnel? Or would they just excavate or dynamite the hillside to open it up completely?

3) Always think of driver views, marshaling and ease of access. For long tunnels on a straight, some track builders have used an avalanche tunnel, which is semi-open at one side, allowing drivers to see the cars and retrieve them without too much trouble, if needed. It's a smart approach.

A real-world example of an avalanche tunnel

4) Don't think you need to run the track through a tunnel to get the visual effect. This was something I saw many years ago, where the builder was creating a mountain/hill track but did not want to "force" a tunnel into a limited space. Since it utilized a road circuit anyway, he introduced a tunnel at an "intersection" that fed onto the track. It provided the illusion and interest of a tunnel without having to compromise on driver views--and it looked natural. I used this approach on my last track, where it blended into the landscape smoothly.

I used a tunnel like this on my old track - it blended right in and looked natural.

In short, tunnels can add a lot of interest if designed thoughtfully and made to look as realistic as possible.Overpasses can involve some of the same types of challenges, but they are often necessary (as a matter of track design) and can be kept to a minimum with good planning. The key is to look at what's out there in real life and try to design accordingly.


Sunday, December 11, 2022

Back to Hobby Time as Retirement Looms...

 It's been over a year since I last posted - a lot has been going on. While Covid is not as big a deal as it was in 2020-21, I am still working primarily from home and that will  no doubt continue for the next 18 months, after which I will be ready to retire. I recently had a major job change...still working for the same electric utility, but in a different capacity. Also, we did a major bathroom remodel last spring which took a great deal of time and effort.

Now my attention has returned to the basement once again, and I am revising my plans for a new track. Last time I posted, I was contemplating plans to make a track that folded up against the wall in one section of our basement--a room about 10' x 12' that is off to one side. At the time, we wanted to utilize as much of the basement as possible for entertaining, but since then I have come to the realization that the space in question is not really needed for this, and that it could be re-claimed for my track space as before. 

Of course, my biggest regret is tearing out the old track I had in this space--which was about 70% finished - but I will approach the next effort with lessons learned and a better build-from-scratch approach, in terms of the table, built-in storage, integrated power and electronics, and other systems. In the end, I think I'll have a better result instead of something that was cobbled together on the fly. More to come soon.

Thursday, June 24, 2021

Planning a Pit Building for The New Schweizering

Although it will be awhile before I can actually start construction of my track, I know enough about the overall design parameters that I can start building some of the major elements that will go into it. The major element here will be the grandstands and pit building, which will be built primarily from scratch while integrating the four Artin Grandstands I have into its upper level. The planned structure will actually be made in three separate sections, as all the buildings on the track will be removable and stored when the track is folded up against the wall. During setup, they can be dropped into place and the electrical connections for lighting can be plugged in.

This is the preliminary plan for the 3-level pit / grandstand structure.

Since the backstory of The Schweizering is that it is an all-new Swiss racing circuit featuring modern, state-of-the-art structures and amenities, I had to come up with a suitable design. Some of the buildings (including this one) will feature large-scale graphics showcasing some of the great Swiss racing drivers of the past, like Jo Siffert, Clay Regazzoni and many others. As usual, I construct these buildings primarily out of foam core, supplemented by cardboard and some bits of wood. Since there is a lot of glass--particularly in the central control tower--I've got plenty of acrylic sheet on hand, too. Integrating the Artin grandstands is pretty simple; the top level of the structure essentially gets "built around" them.

I think the large scale graphics on the side of the building will have a lot of impact.

I construct the building from the ground up; I used corrugated plastic board for the facade of the pits, as I like the subtle ribbed texture it has. I sprayed it with a silvery nickel metallic paint, to give it a contemporary, modern look. Foam core makes up the side and interior walls, which are covered with self-adhesive wall sheets I created on an inkjet printer in various color combinations. The photo below shows the individual wall sections ready for assembly; when ready, I'll print and place the interior back walls but the interior lighting will have to go in first. As you may note, the building is only about 6.75" deep, which just barely accommodates most slot cars; this is due to space limitations but should be adequate from a visual sense.

Here is the facade of the pit garage with the interior walls ready for assembly.

For interior lighting, I'll be using some LED strip sections in bright white, which should work well for the pit garages. I'll probably use a warmer white lighting in the VIP suites and the upper grandstand sections. While it's not rocket science, planning and running the lines to keep connections to a minimum and maintaining portability takes care. As I move forward on construction, I'll try to show as much progress as I can and even take some videos.


Friday, May 7, 2021

Yes, I am Currently Track-less. But We're Going to Fix That.

Ever since I had to remove my last track a couple of years ago, my remaining scenery bits, track sections and, of course--cars--have been sleeping silently in the basement. As I have recently gotten back into the hobby, going through what I have on hand and buying new cars, I've considered what my options are in terms of a new track.

My original slot car track. Had a lot of fun - would be happy with this, now.  

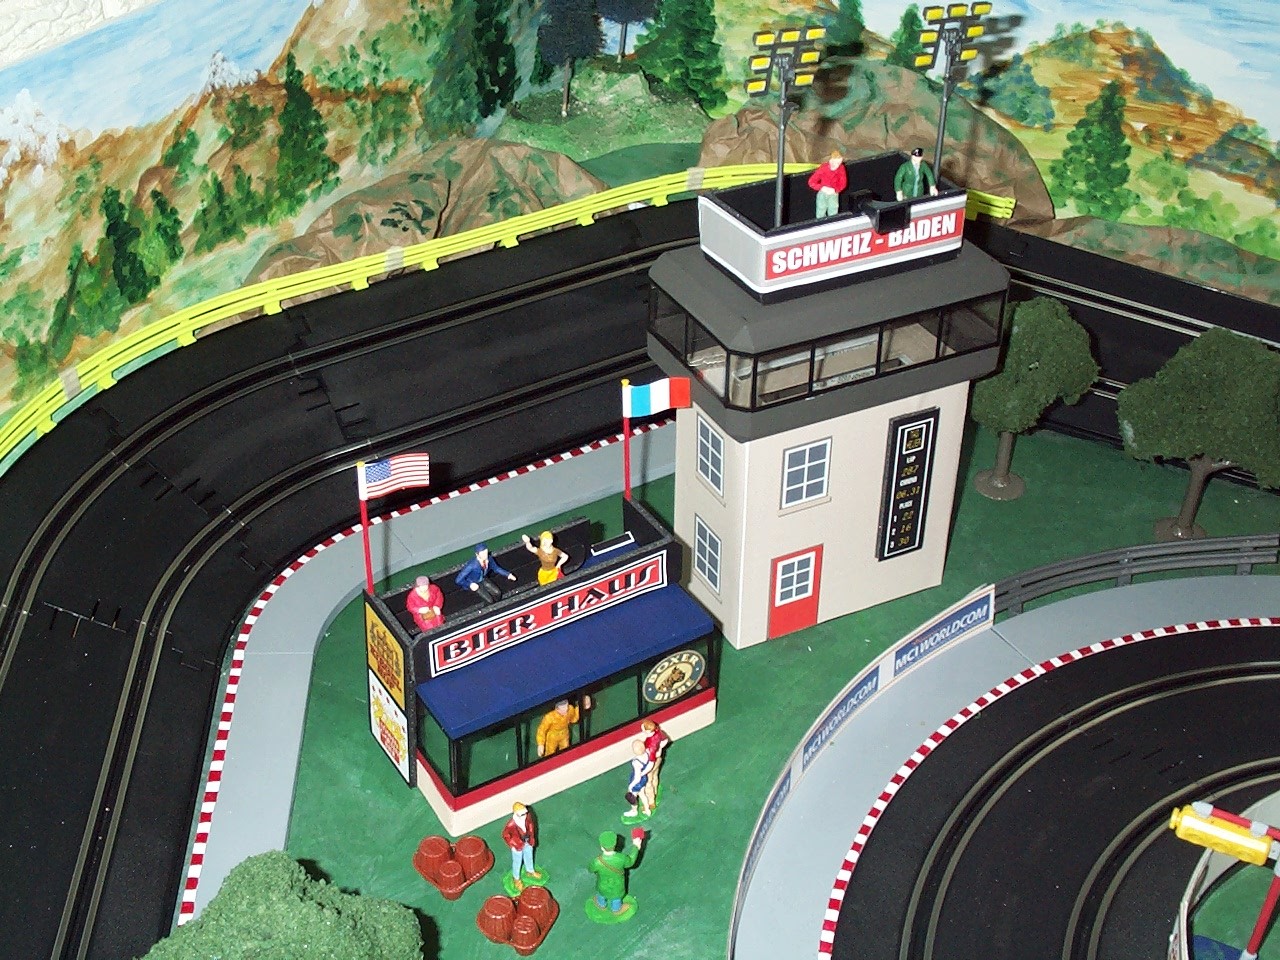
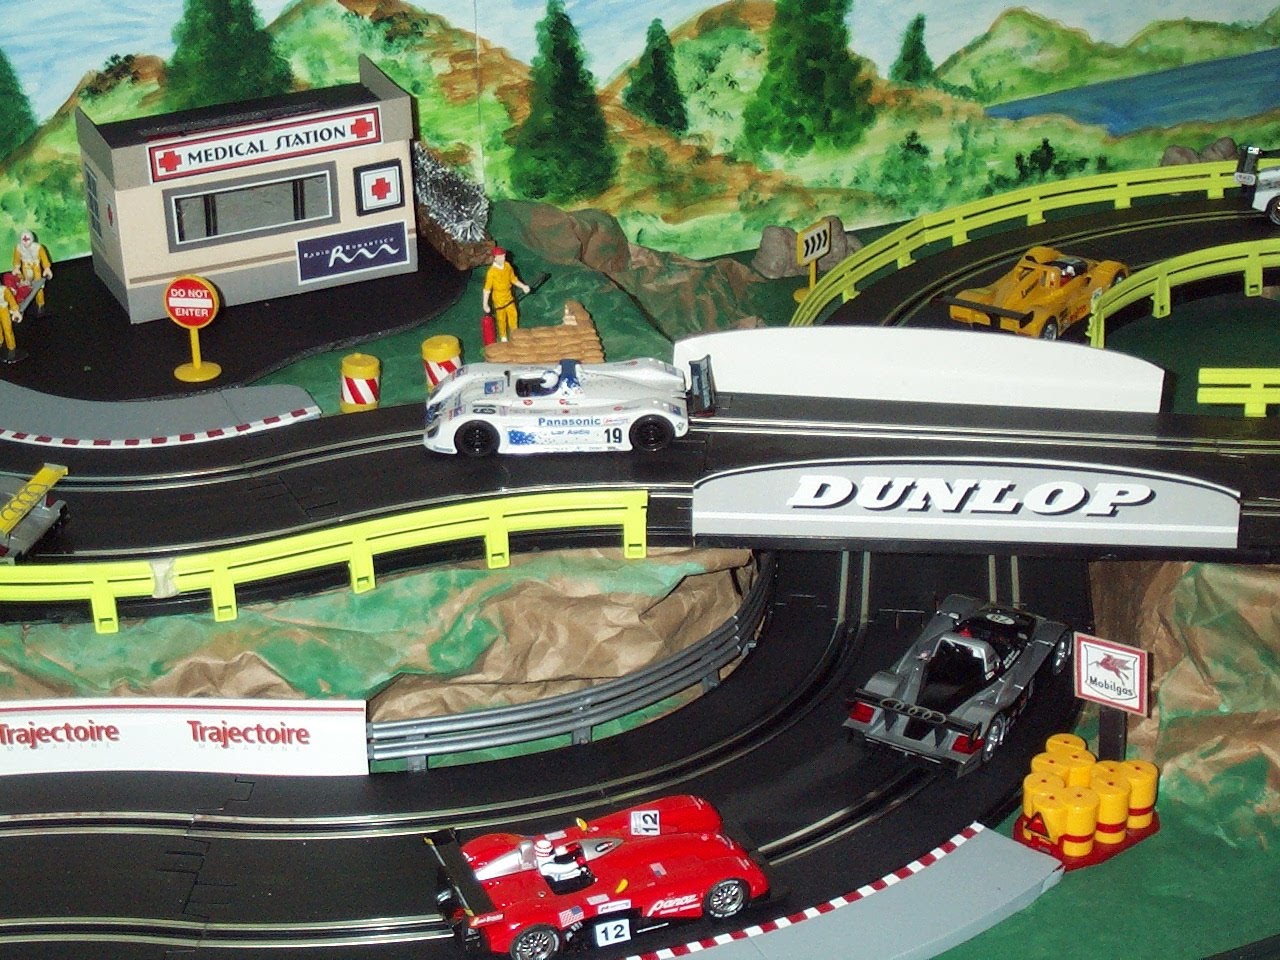
A view of my 2nd track. The Schweizering. It will live again in a more compact form.

To review, the space where I had my permanent track was "commandeered" by my wife as I continued work on our basement remodel. She wanted the 12' x 10' space in question for entertaining, with a round dining/poker table at the center and maybe a set of base cabinets on a back wall. Looking back, perhaps I was too quick to accommodate her - but there is a reason they say "Happy Wife - Happy Life." In any case, over the last few months, I considered the following:

I did not want a track in the garage. A small, portable one that I could move outside might be fun, but that wouldn't be optimal for the kind of scenery I like. Also, an unheated garage up north is a terrible place to have a track, with moisture and inevitable freeze/thaw cycles. Too much dirt, bugs, dust, etc.

It had to stow away out of sight when not in use, and be easy to set up. I don't have room for large sectional tracks, or to having something dropping out of the ceiling. I wanted it to be ready to race on in 15-20 minutes at the most.

The right size. It had to be compact enough to hide, but big enough to offer a good driving challenge and some space for scenery. And scenery complicates things, of course.


Had to be permanent or semi-permanent. While I start out with sectional track, I don't redesign layouts weekly or just set up on a tabletop. I build the track into the landscape, paint it, and copper tape the rails. 


Having sorted through these must-haves and must-nots, I settled on the following concepts:

The best place for the track was where I originally had it, in the 12' x 10' basement space. The only difference is it would have to fold up against a back wall above the base cabinets, and could not be as large as the old track.


There would be a height limit on any "permanent" scenery.
Anything in the landscape can't exceed about 7" in height, or it would be crushed against the back wall. The track surface would fold into a box about 7.5" deep, located above the base cabinets. Anything above that height--like buildings, street lights, big trees, etc.--would have to be removable and dropped into place during setup.


 Lights, power, electrical connections, PC hookups, etc. would all have to be "modular." That means they could be easily plugged in-and-out, moved out of the way and generally "disappear" when not in use. My inclination here is to build a moveable cart that would accommodate all these items, with accommodating connecting jacks built into the track structure.


The last track I had was about 50' in length. The extensions along each side ran the full length of the 10' side walls. I can only use about half of that space with the new track, which will be about 35' in length overall. Still, I think it will be enough space to provide sufficient challenge and interest over the long term. I'm sure I could get more track into the space, but I resist the temptation to do that, as I think the resulting overpasses and side-by side straightaways look unnatural.

So the new track will look something like this.

At some point I will get into a more detailed discussion of my own track design philosophy. You need balance; as much as I like scenery-making, I don't think it's necessary to cram spectators, structures and other gimcracks into every square inch of the track space. Too much incoherent clutter only detracts from your race track's best features. Having some open space enhances them. Nuff said for now.


Friday, March 12, 2021

So...What Have You Been Doing Lately?


Time flies by so fast - it's hard to believe it's been over 7 years since I posted something on this blog. And a lot has happened since then.

My trouble is the trouble I have with all my hobbies and interests: I have too many of them. I tend to rotate my activities throughout the year on a seasonal basis - and sometimes work and other long-term projects interrupt my hobby interests over an extended period. This has been the case since I went to a new department at work a few years ago and got involved in some historical projects in one of our city's neighborhoods, which has dominated my time for quite a while.

The most direct effect on my slot car hobby is that I have been working on remodeling my basement for the last couple of years and as a result, removed the track I had worked so hard to build--The Schweizering. My wife said I would have to give up the 10' x 12' space where the track was located so we could include some base cabinets and a dining table in the area. Her insistence met no resistance at the time, as I needed little convincing to tear out the whole thing and toss most of it, save some of the buildings, all the figures and a handful of scenic elements.

I had considered building some sort of portable track, but recently settled on a better solution--which is to build a new track that folds up against the wall in the very same space where I had the old track! I'll provide more details on this as I settle on a final plan, but essentially it will be about 11' wide x 5' deep (with a 3' x 2' cut out on one side to accommodate a basement window when folded up against the wall). As a result, track height variations will be limited to about 6.5 inches overall, as the whole thing will fold up into a box that's about 7.5 inches deep--so there will be no "hill climbs" like I had on the old track.

There was about a 16" vertical level change on the old track.

The fold-up track will allow me to primarily use the basement space as my wife prefers, but still provide enough room to enjoy a decent-size track of about 35 feet or so. Of course, any scenery or buildings over the height limit will have to be portable and easily placed/removed with in a short period of time. This will require a lot of planning, as I want to have some lighted elements and this will mean being able to place and plug in various scenery modules, but that will be a fun challenge. More to come...


Thursday, November 18, 2010

Newest Track: The Schweizering - Part Three

Just a brief update on our progress - the Pit/Grandstand building is shaping up nicely...it's turning out to be a fairly large structure - with three Artin grandstands, three VIP suites, a control tower and ten pit garages, the whole thing will be about five feet long. The basic structure is complete, but there's a lot of work yet to do, including the roof, back walls and interiors for the VIP suites, garage doors, lighting, etc. - but the photo below gives you a pretty good idea of where we stand.


At the bottom of the photo, you can also see the "parking garage" underneath part of the track - where I plan to store some of my extra cars (especially some of the older ones that have no display case). Below, you can see a photo of the garage itself, showing the simple LED lighting that's currently installed.


Work on the structures is pretty much at a standstill right now as I complete the rest of the structural work on the track - including the elevations and mountain forms, painting and filling the track surface, and laying copper tape. I'll include some photos of that work in the next Schweizering installment.

[]

Wednesday, November 17, 2010

My Old Track: Circuit Schweiz-Baden

While we're hard at work on the new track, I thought I'd drop in a few photos of my first track, Circuit Schweiz-Baden. Below is the original description I included for an old RadTrax customer track contest:

"Schweiz-Baden was designed as a purely fictitious place, nestled at the foot of the Swiss Alps...just a stone's throw from the wooded forests of Alsace-Lorraine. The circuit was mainly home to Le Mans prototypes of the coupe and open-cockpit variety, though a wide range of modern and classic GT cars also ply its many challenging curves. The track was landscaped and includes a hand-painted backdrop, combined with several areas where painted scenery and three dimensional models blend together (see the village area). The L-shaped tabletop is approximately 4' x 12' along the back side and 3' x 6 foot along the right-hand side.


The main section contains a paper-clip arrangement, with the main grandstands and pits surrounded by outside straightaways--and at one end, the "Trinity Curve"...a banked section with three inside 60-degree curves (curve-straight-curve-straight-curve). This came about because some of the longer cars couldn't take more than two sections of the tight Artin banked curves at a time. The smaller table section contains the "esses"...raised on a upper level of track--all supported on a 4" layer of foam, which is covered with crumpled and painted landscape (kraft) paper--an old and very cost-effective model RR trick. Schweiz-Baden features a wide range of varying curves and level changes over it's approximate 58 ft. length, and believe it or not, sub-10sec. lap times are not that easy to come by--even with an out-of the box Fly.


TRACK DETAILS

The track is a hand-laid (no computer plan) Artin 2-lane setup, with custom-painted borders...and I also blacked-out the dotted-white-line separating the lanes. The power supply is from the Artin 4-lane set, it provides separate power to each lane, and I splice-wired the extra leads to double the per lane amperage from 1.5 amps to 3. That and the Parma controllers make a BIG difference in the overall enjoyment level. Look at the photos and I think you'll agree that it is indeed possible to design a unique and challenging layout with Artin track. (Okay, it did take three different sets...) Artin Lap Counter/Timer; Ninco, SCX and Artin barriers, with white board advertising barriers slipped into channel at edge of track.


SCENERY

The Control Tower, Pits, Medical Station and Beer Haus (concession stand) are hand-made from foam-core, cardboard boxes and clear plastic boxes. Many of the building exteriors are inkjetted onto large sheets of adhesive-backed paper, then applied to the structure. A mix of porcelain "collectible" accessories (I painted out the snow) and other painted toy buildings round out the architectural mix, which includes 3 painted Artin grandstands. The track signs blend old and new logos, along with local (Swiss & European) advertisers like banks, magazines, radio stations and even passenger railroads. My overall goal was to make the elements blend together as well as possible, with enough scenery to add interest and fun--but not to overdo it by trying to cram as much as possible onto the table."


As it turns out, the basic inspiration for the original track and scenic themes will be carried through on The Schweizering. Of course, the result will be better this time, we hope.

Sunday, November 14, 2010

Monte Carlo Rallye Track for Sale Now on Ebay

Bill - or slotforum member jmswms - has established the highest levels of craftsmanship when it comes to building multi-level, scenic mountain rally courses. We've enjoyed many of his projects like his Targa Florio course - but this Monte Carlo Rallye track - built for a special Petersen Automotive Museum event in LA is really incredible.


Bill is about as good as they come when it comes to modelling mountainous areas, like the French Alps around the Pont des Miolans, which this track is based upon. Bill's probably forgotten more about scenic modelling than many of us have ever known, and each new project he takes on is a real wonder. Since the museum event, Bill has begun adding even more detail to this particular track, like the French village elements and additional lighting seen below.

PHOTO CREDITS: ebay.com.

Of course, it should be added that this fantastic Monte Carlo Rallye track is for sale, with part of the proceeds going to the MSFriends charity that co-sponsored the event. Check it out now on Ebay. To see more photos of the track and how it was constructed, visit the thread about it at slotforum.com

Friday, November 5, 2010

Newest Track: The Schweizering - Part Two

In planning, it was clear that rather than placing drivers at the inside of the "U" where they would just block each others' view, it was decidedto just "hang" the drivers station and the control PC from a steel support pole (already there) placed back far enough to give a good view of the track while still allowing drivers to move forward for marshalling. I'll run the cabling and wire-work either up and down across the ceiling or in a cable channel across the floor. The monitors for race control will be mounted just under the track surface, at the bottom of the "U" - and tilted slightly upwards - where I think they will fall into the drivers view a little better than if I was to hang them from the ceiling.


THE MEDIEVAL CITY - AFTER PAINTING THE CASTLE STRUCTURE AND WALLS.

It took a lot of trial-and-error when it came to getting the paint job on the castle and city walls just right. A combination of dark washed and light dry-brushing seems to have provided the right effect, and I an pretty happy so far. The castle sections are really the centerpiece of this old town - everything else kinda follows; The tower will get a shiny finial on top of it's verdigris-copper dome, and it also needs a good wash to simulate some corrosion. The rest of the town buildings will be a little lighter and brighter, with some hanging flower baskets and window boxes (this IS Switzerland, after all. I'm also working out how to light the buildings here as well, and am getting ready to start the stone ramp/bridge that heads up into the town.

THE MAIN STREET THROUGH THE CITY - TRACK FILLING AND PAINTING HAS BEGUN.

I've also altered the plan a little already. I needed to take a length out of the back straight in order to leave enough room for my track borders on each side of the room. Here is a revised diagram (below). The Curves are all R1s (17) and R2s (16) - I use them in different combinations to try and keep things interesting. On the diagram, the R1s have the dotted line - the R2s do not. (the diagram is from Ultimate Racer 3.0) I also use 22 full straights, 1 half straight and 3 double-length hump-back straights (normally used to build overpasses) for the rest. The diagram switches out a full for a half straight on the left side, just to keep the layout clearer.


THE REVISED TRACK PLAN (CLICK TO ENLARGE).

The curvy side at left gradually rises to just over a foot or so before heading back down through those esses. The "hump" tracks are used in an "up and up" fashion, heading up the hill climb, rather than in the normal "up and down" way. More on my progress later...

Sunday, October 31, 2010

Newest Track: The Schweizering - Part One

Having started this blog journal, one of the primary thing's I'll be focusing on is the construction of my new track, The Schweizering - this will be built from all the Artin track I have accumulated. The track will have the seams filled and will be painted as well, with copper tape applied over the rails. The room space I have to work with is about 12' across and 10' deep.

THE TRACK AS IT ENTERS THE WALLED MEDIEVAL CITY.

This new track will be set in the alps - and has three distinct parts. At the right, the track heads up a hill and through a sort of city gate into a Swiss town dating from the medieval era. Through the town, it heads back through a turn and down to run below the ancient city walls, then under the bridge at the barbican and around toward the new portion of the track, located at the rear of the layout. In contrast to the city, this portion will be very modern in appearance, anchored by a large pit/grandstand/tower structure. Working pits would be nice - but I'd have to route-and-rig something from scratch, and I'm just not ready for that right now.

THE BASIC TRACK PLAN (CLICK TO ENLARGE).

The left side of the track will be more open space, with trees, and where the alpine terrain is more in evidence - with a short tunnel and some substantial rock work. This portion will gradually rise up a foot or more toward the "esses" at the bottom of the diagram, then back down toward the center of the "U" - across the table and then back up into the city again. On the hilly (left) side, I am also tempted to model a cable-car and platforms - running up to the high end of the track. It will probably be a static example, though, since I haven't figured out the rigging yet - and unless I had it on a delay and timer, would probably be too distracting going back-and-forth very often.

At first, I was planning to scratch-build the town, gate, but then I came across a great old 1:32 scale castle that was sitting under a bed in the spare room...where its been for about 10 years. German-made (Jean Hoefler, I think) I had bought it for my son over 15 years ago, but he practically never played with it. After inspecting it for a few minutes, I took it apart and started playing with the parts and pieces until I found a combination that started to look right. (See top photo).

That's all for now. I'll update more on the progress so far in the next post.

Search SLOT, Links & the web

  © Blogger templates ProBlogger Template by Ourblogtemplates.com 2008

Back to TOP